In this tutorial you’ll learn how to setup a static IP on a Raspberry Pi device on your local network. This will give you the ability to access your Pi from anywhere in the world.
Internet service providers prevent you from hosting websites from your home computer because they suck. They specifically block the common ports used to host websites and use SSH. So if you want a static IP on your home network (which is required to host a website or service) from your home computer, you need to upgrade to the “business plan” which can be expensive. I’m a frugal person so I’m not going to waste my money on that.
Recently I found a way to get a (virtually) static IP without upgrading my internet service. You can thank my cat for this one because my purpose was to use a Raspberry Pi to spy on her while I’m away. So now that you have some background information about this project, here are some prerequisites to get your own static IP from your Raspberry Pi at home.
Prerequisites:
- Raspberry Pi with Raspbian installed
- If you do not have Raspbian installed on a Raspberry PI go here
- Access to Router administration (I have a Panoramic TG1682 with Arris admin)
- Computer with SSH
- CloudFlare account (Free)
- Domain registered to you, with the name servers pointed to CloudFlare
- Basic Knowledge of DNS
- An ethernet cable (CAT5)
Step 1: Connect your Raspberry Pi to your Network
The first step is to connect your Raspberry Pi to your local network via the router. Use your ethernet cable to plug your Raspberry pi the directly into your router or modem. Since this is a direct connection you should not need to enter a password and the RPi should connect to the network.
After the Raspberry Pi is connected to your network you need to find out its IP address. On a mac, you can type this command to list the IPs connected to your local network:
arp -a
This will give you a list of IPs connected to your network, but it will not display information about each device. I don’t have many devices on my network so I just tried to SSH to a few IPs until I was able to connect to the Pi.
To SSH to your Raspberry Pi:
ssh pi@192.168.0.7
Default Credentials:
username: pi
password: raspberry
There is probably a more eloquent way to find out your IP address but this worked for me. You will need to find this IP before continuing.
Step 2: Update your system
Once you are logged in, you should update your system. This will ensure you have the latest packages:
sudo apt-get update && sudo apt-get -y dist-upgrade
In addition to upgrading your system, you should also update the timezone. Enter the command below, then select your timezone.
sudo dpkg-reconfigure tzdata
You’ll need a good text editor for the following steps. I recommend installing a good vim configuration. You can also use the build in nano editor as well. Vim installation instructions:
sudo apt-get -y install vim
git clone --depth=1 https://github.com/amix/vimrc.git ~/.vim_runtime
sh ~/.vim_runtime/install_awesome_vimrc.sh
Awesome work, you’re ready for the next step!
Step 3: Give the Raspberry Pi a locally static IP address
Now that you have your device information, you need to make sure that your device always gets the same IP assigned to it from your router. Routers use a program called DHCP (Dynamic Host Configuration Protocol) by default to assign devices IP addresses on your local network. This is a problem because you will need to configure your router to send traffic to a specific IP address later.
To make your Raspberry Pi always get the same IP address from your router you need to modify a configuration file on your Pi.
/etc/dhcpcd.conf
Before modifying any configuration file it is always a good practice to make a backup of the original.
sudo cp /etc/dhcpcd.conf /etc/dhcpcd.conf.bak
Once you have a backup of your dhcpcd.conf, you need to change these lines:
From
# Example static IP configuration:
# interface eth0
# static ip_address=192.168.0.7/24
# static ip6_address=fd51:42f8:caae:d92e::ff/64
# static routers=192.168.0.1
# static domain_name_servers=192.168.0.1 8.8.8.8 fd51:42f8:caae:d92e::1
To:
# Example static IP configuration:
interface eth0
static ip_address=<DEVICE_IP>/24
static ip6_address=fd51:42f8:caae:d92e::ff/64
static routers=192.168.0.1
static domain_name_servers=192.168.0.1 8.8.8.8 fd51:42f8:caae:d92e::1
Be sure to replace <DEVICE_IP> with the information you obtained from the previous step. Once you have updated these values and uncommented the lines in the configuration file. You can restart your PI at any time and it will grab the IP specified! Great work! Your Raspberry Pi has a static IP on your local network now!
Note: If you have a lot of devices on your network, you may want to change the last number in the IP to something higher than 7 (192.168.0.7). The reason is that if that IP is taken, then DHCP will find a different IP to assign to your Pi. I chose 192.168.0.7 because it was what my Pi obtained.
Step 4: Setup Port Forwarding
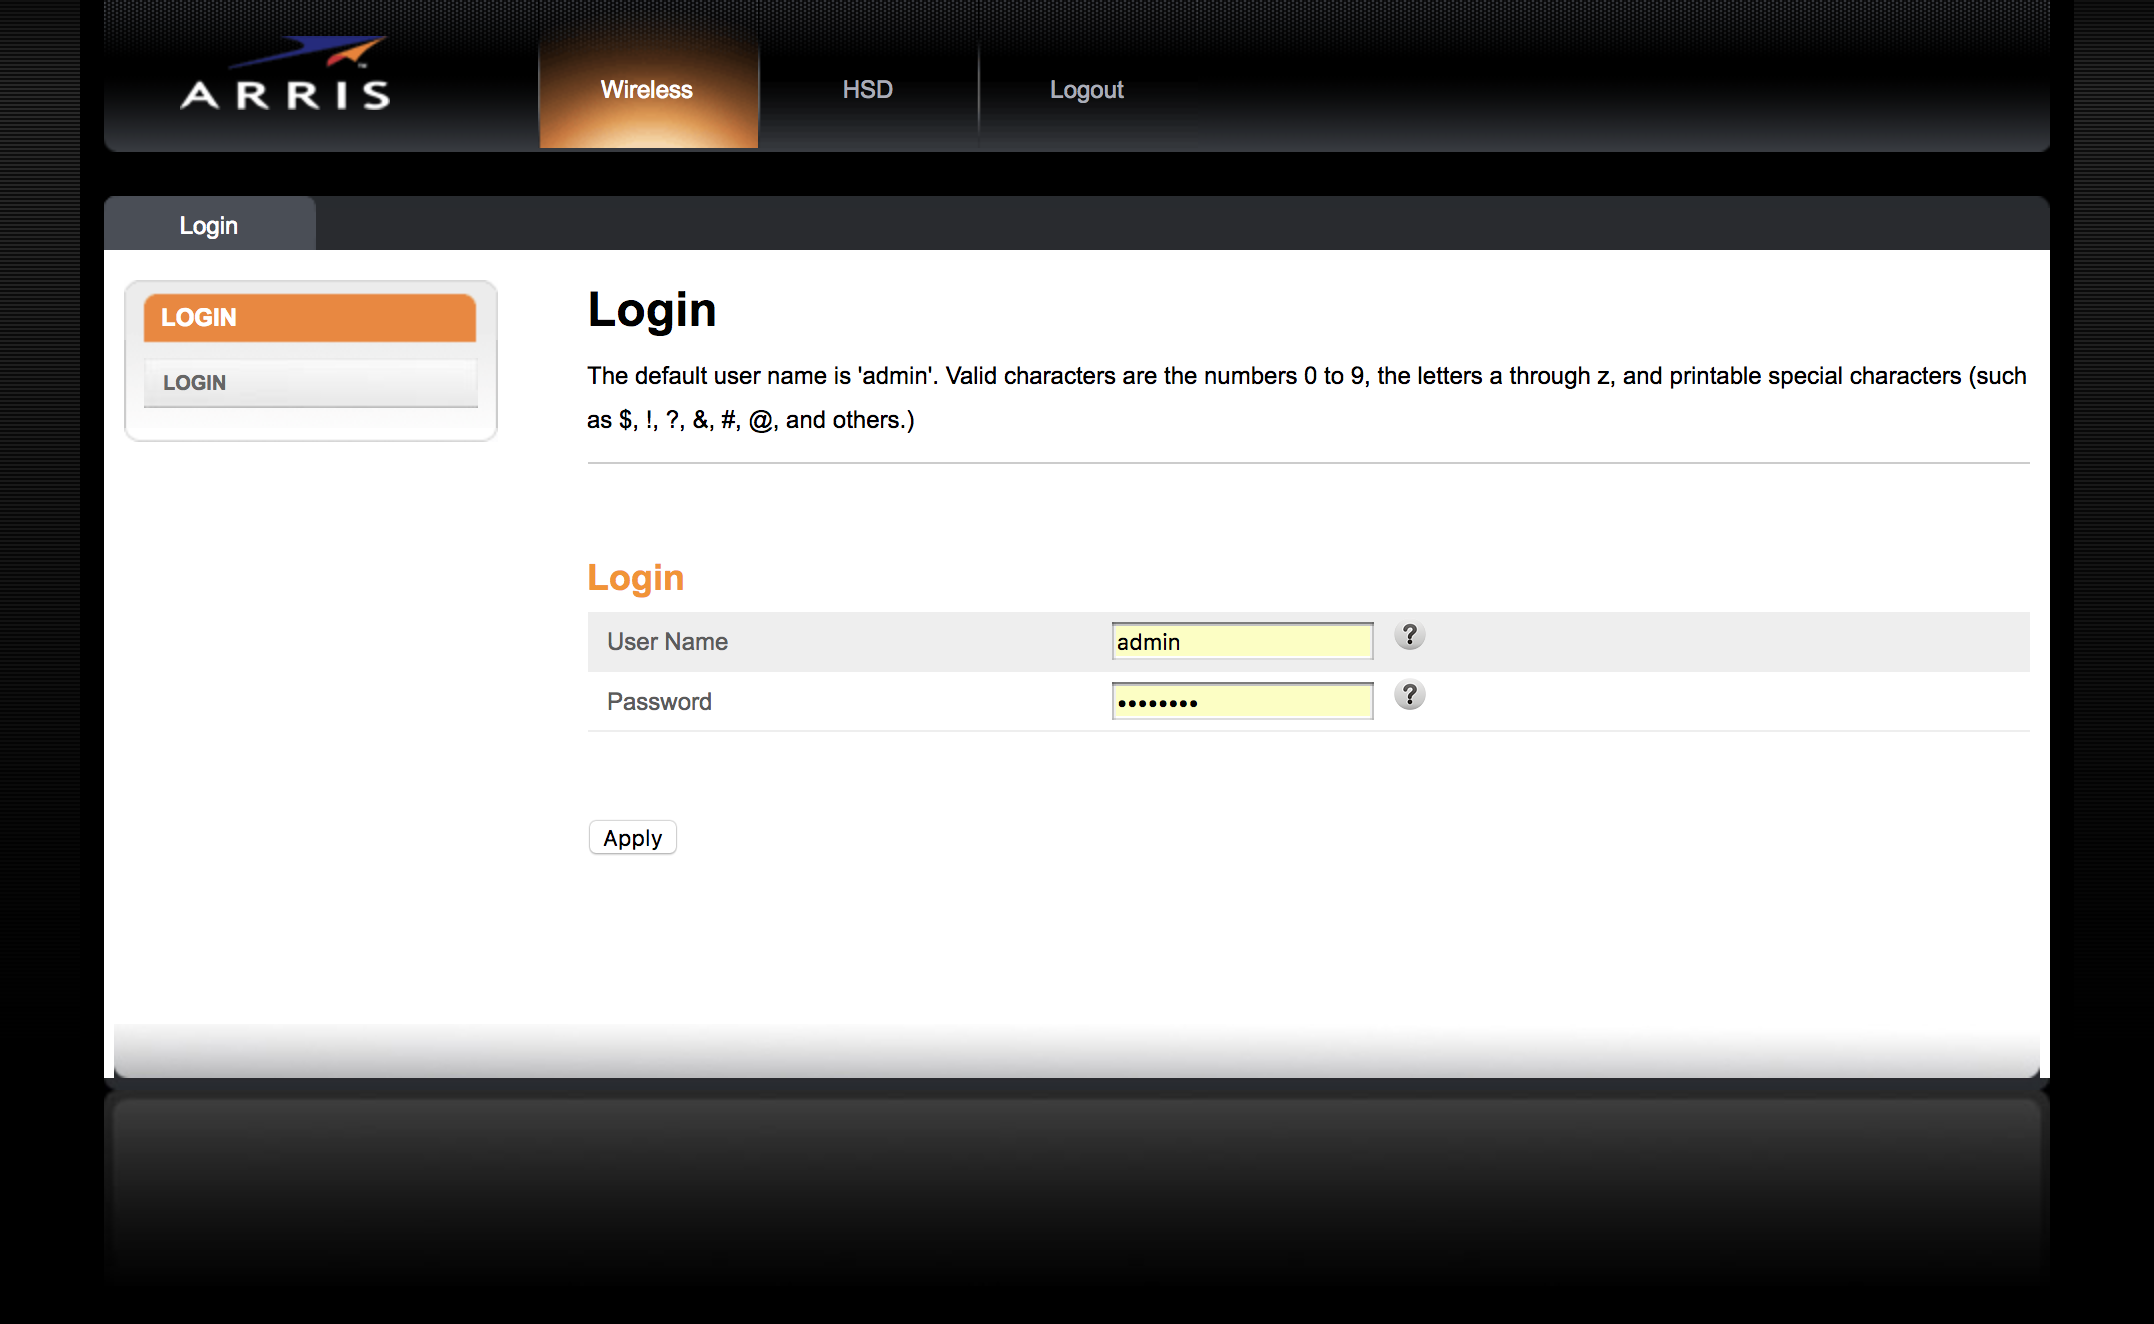
Now that your Pi has a static IP on your local network, it’s time to setup port forwarding on your router. Routers are all a little different so you’ll probably need to Google how to access the admin and how to configure the port forwarding. If you have a Panoramic TG1682 with Arris admin, you should be able to follow this guide.
The admin is generally at:
http://192.168.0.1/
This should direct you to the login screen for the routers admin. Mine looks like this:
After you login to your router find the port forwarding section under the Firewall settings. The page for port forwarding on my router was “Virtual Servers / Port Forwarding.” The goal her is to direct incoming traffic from the outside world (external networks) to your device, on specific ports. As I mentioned earlier, ISPs tend to block common ports like port 80 and 22, so we’ll use port 2222 and port 8081. You can try test for other open ports to use if you like.
Here is the menu to add port forwarding for me :
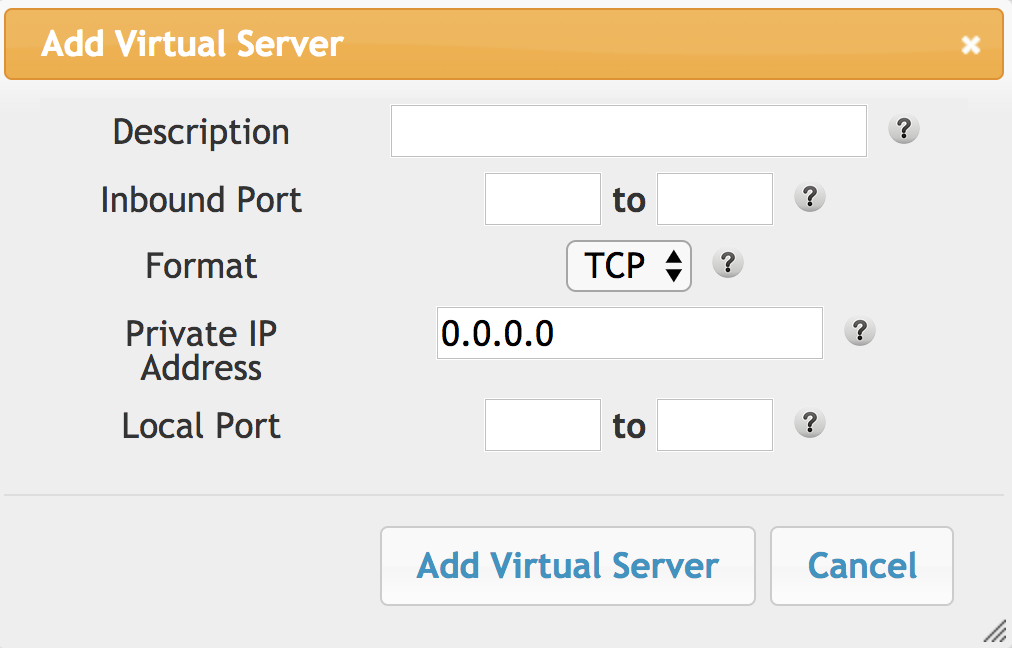
Ignore the fact that everything says “Virtual Server” because “Port Forwarding” and “Virtual Server” mean the same thing in this case.
Let’s setup port 2222 for SSH. (22 is normally blocked by ISPs for incoming traffic)
Find the form to add port forwarding and let’s step through the options:
- Description, this is just a name for your new Port forwarding map
- Inbound Port, here we are asked for a range of port numbers to allow traffic in from the internet. Let’s add 8081 to 8081 here.
- Format, The format specifies the type of traffic to allow through this port, change this to all or both if you can so we don’t have to worry about changing this later. UDP is an IP protocol that doesn’t verify packet size or do error checking which makes it a faster protocol.
- Private Ip Address, This needs to be the IP of your Raspberry Pi that we configured earlier.
- Local Port, range of ports to send traffic to on the actual device. To keep it simple use the Inbound ports.
After filling in the blanks you should have this. Of course, the private ip may be different:
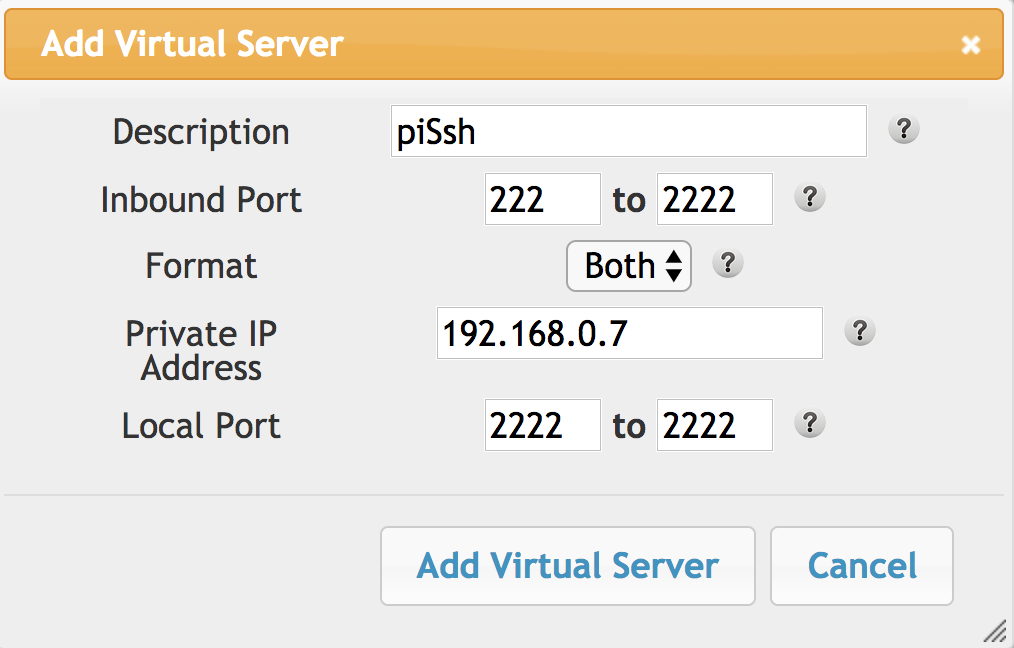
Congratulations on getting the port forwarding setup for SSH! Time to update the port on the Raspberry Pi.
Step 5: Update the Raspberry Pis’ SSH Port from 22 to 2222
Raspbian comes with SSH installed and it uses the default port which is 22. Let’s change the port to 2222.
You’ll want to have sudo privileges if you don’t already have them:
sudo su
The file we are about to edit is the primary SSH config file:
/etc/ssh/sshd_config
Again, a good practice is to backup your config files just in case:
cp /etc/ssh/sshd_config /etc/ssh/sshd_config.bak
Now open ‘/etc/ssh/sshd_config’ and simple change the port from 22 to 2222
# From
Port 22

# To
Port 2222
Save this file and reload SSH:
service ssh reload
Now that this is complete, the next time you use SSH to login to your Pi you’ll need to specify the port like this:
ssh pi@192.168.0.7 -p 2222
Great work on updating the SSH port! Go 2222!
NOTE: This may not be a necessary step since the ISP cannot block a local port. Nevertheless, it is still a good security move.
Step 6: Get your Public IP
Alright, we’re getting close to the fun stuff, I promise! We need an programatic way to obtain you networks public IP from our Pi. After a couple Google searches I found a simple bash script that grabs this IP for us, but first you’ll need to install dig, a super cool DNS utility:
sudo apt-get -y install dnsutils
Now that you have dnsutils installed on your Pi, run this command. This command will give you your networks public IP address:
dig +short myip.opendns.com @resolver1.opendns.com
Ths IP output to terminal should be the same as the IP you get when going to http://www.whatsmyip.org/
Here is a handy the script to get your public ip and save it to a file:
#!/bin/bash
myip="$(dig +short myip.opendns.com @resolver1.opendns.com)"
echo "My WAN/Public IP address: ${myip}"
echo "${myip}" > ip.txt
Save this to a file called get_ip.sh
Step 7: Configure Domain at CloudFlare
Now that you have your networks public IP you can setup your domain to point to it. Go to CloudFlare and to your domain DNS section. From here you will add an A record called pi with the IP we just got from our script.

Of course, replace <your-public-ip> with what you got back from our script.
We also want to click on the orange cloud so that our traffic doesn’t go through CloudFlare. Your form should look like this:

NOTE: I’m not 100% sure that you need to do this, but for our purposes lets remove extra barriers to our server.
Alright, we have our DNS record pointing our domain to our local network IP. Give CloudFlare a minute or two to propagate this record and we will be able to test our connection.
The easiest way to test that our Raspberry Pi is reachable from the outer networks is to ping it from another server. Goto https://whatsmydns.net and enter your domain.
Here is this domain as an example. If you see the green checks then everything has worked so far:
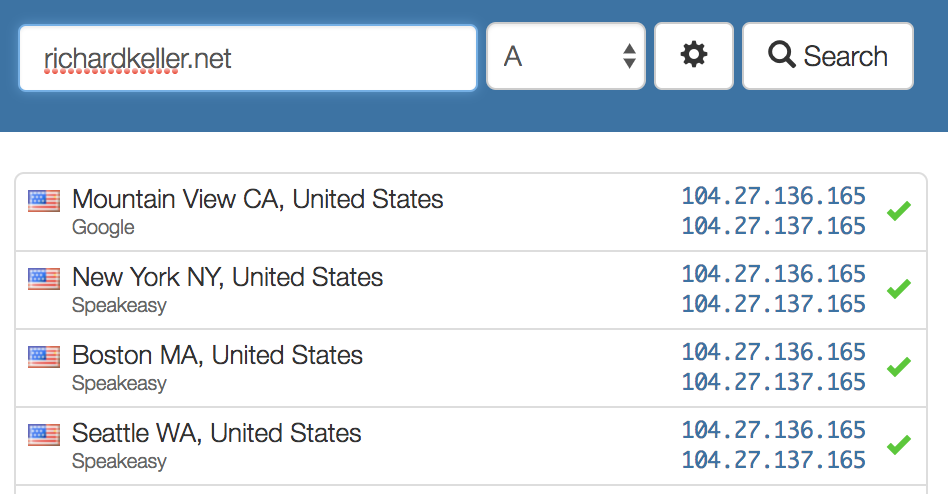
If you got some or all green check marks congrats! Your Pi is accessible from the outside networks! If not, you may need to give the DNS more time to propagate.
Since our ISP will change this from time to time, let’s automate the process of updating this record.
Step 8: Setup Cron to Update CloudFlare
Now for the magic! So we have our domain at CloudFlare and pointed it to our public IP. The issue with this is that our ISP will change our IP from time to time. When this happens your server will become unreachable from outside networks.
To mitigate this issue, we will setup a cron that resolves our public IP address and sends it to CloudFlare to update our DNS record. In this way, we have a virtually static IP. We’ll need some information from CloudFlare in order to complete this task.
- Get your Global API key. You’ll find this on the Overview section of the domain you are using.
- Get the zone ID for our CloudFlare account. This can be found on the domains Overview section as well.
- Get the record ID for the record we want to update. This is a bit more complicated. Using the two IDs you gathered in steps 1 and two run this command from the terminal:
    curl -X GET "https://api.cloudflare.com/client/v4/zones/<ZONE-ID>/dns_records?type=A&name=<SUB-DOMAIN>&page=1&per_page=20&order=type&direction=desc&match=all" \
          -H "X-Auth-Email: <YOUR-CLOUDFLARE-EMAIL>" \
          -H "X-Auth-Key: <GLOBAL-API-KEY>" \
          -H "Content-Type: application/json"
Notice the variables here:
<ZONE-ID> is the string from step 1.
<SUB-DOMAIN> is the subdomain is the string value of the A record from Step 7, plus the domain you are using. My <SUB-DOMAIN> string was pi.richardkeller.net.
<YOUR-CLOUDFLARE-EMAIL> is the key you got from step 2.
And don’t forget that you need to replace <YOUR-CLOUDFLARE-EMAIL> with the email address you use for CloudFlare. After running this command you should get back a JSON object with the record id. This record id can be used to update the record via another post request to CloudFlare.
4. Update the DNS record using the record ID
curl -X PUT "https://api.cloudflare.com/client/v4/zones/<ZONE-ID>/dns_records/<RECORD-ID>" \
    -H "X-Auth-Email:<YOUR-CLOUDFLARE-EMAIL>" \
    -H "X-Auth-Key:<GLOBAL-API-KEY>" \
    -H "Content-Type: application/json" \
    --data '{"type":"A","name":"<SUB-DOMAIN>","content":"<NEW-IP>","ttl":120,"proxied":false}'
Here we have the update request to update the record you created earlier. Notice all the variables you need to modify before running this.
One major thing to note is the <SUB-DOMAIN> variable. Unlike the previous command we used to get the record id in which the <SUB-DOMAIN> variable was pi.richardkeller.net. This time we are just going to use the “sub” part of the domain. <SUB-DOMAIN> should just be pi this time.
Another note about this command is that we have a <NEW-IP> variable to set. You can get this IP from running the script we created earlier: get_ip.sh or by checking the website http://www.whatsmyip.org/.
Just to make sure the script works, you can just change <NEW-IP> to any random IP and check to see if the CloudFlare updates. IF CloudFlare does not update, there another issue.
Step 9: Setup Cron to Update IP
Let’s setup a cron to update our Raspberry PI’s IP every day. If you are not root yet sudo su:
sudo su
Now that you are root, create a file called update_ip.sh in /root.
cd /root && touch update_ip.sh
Paste this code in update_ip.sh replacing all the variables like before.
#!/bin/bash

# Get your local networks public ip address
myip="$(dig +short myip.opendns.com @resolver1.opendns.com)"
echo "My WAN/Public IP address: ${myip}"
echo "${myip}" > ip.txt;

# Send API request to Cloudflare to update record
curl -X PUT "https://api.cloudflare.com/client/v4/zones/<ZONE-ID>/dns_records/<RECORD-ID>" \
    -H "X-Auth-Email: <CLOUD-FLARE-EMAIL>" \
    -H "X-Auth-Key: <GLOBAL-API-KEY>" \
    -H "Content-Type: application/json" \
    --data '{"type":"A","name":"<SUB-DOMAIN>","content":"'${myip}'","ttl":120,"proxied":false}' > /dev/null

# Log when the last update was
echo "UPDATE\t${myip}\t$(date +%Y-%m-%d-%T)" >> ~/ip.log
Go ahead and test this code by running:
sh ~/update_ip.sh
If the response is successful, then you are ready to set the cron!
Open cron tab:
crontab -e
We’ll set the cron to update our IP everyday at 2 am by adding this line to crontab:
0 2 * * * sh ~/update_dns.sh
That’s it! Great work! You now have a virtually static IP address without paying for one!